728x90
반응형


이전글에서 ELS Stack 구성하기 위해 설치를 진행했습니다.


이번 글에서는 Logstash의 설정을 알아보겠습니다.


gigas-blog.tistory.com/255

[Server] MacOS X ELK Stack 구성하기 #1 설치

어플리케이션이 구동 중 발생하는 Exception을 모니터링할 수 있는 시스템을 위해 ELK Stack 환경을 구성하려고 합니다. ELS (ElK Stack) 구성 Java 8 Elasticsearch 7.1 Logstash 7.1 Kibana 7.1 Mac OS X에 ELK..

gigas-blog.tistory.com


우선 services로 등록된 목록을 조회합니다.

brew services list


logstash의 상태가 error로 나와있는데

Name          Status  User  Plist
elasticsearch started gigas /Users/gigas/Library/LaunchAgents/homebrew.mxcl.elasticsearch.plist
kibana        started gigas /Users/gigas/Library/LaunchAgents/homebrew.mxcl.kibana.plist
logstash      error   gigas /Users/gigas/Library/LaunchAgents/homebrew.mxcl.logstash.plist


logstash.log 파일을 보면 왜 error 가 발생하는지 확인이 가능합니다.

/usr/local/var/log/logstash.log


내용을 보면 pipeline.yml 설정파일이 비어있다고 나오는군요.

ERROR: Pipelines YAML file is empty. Location: /usr/local/Cellar/logstash/7.12.0/libexec/config/pipelines.yml
usage:
  bin/logstash -f CONFIG_PATH [-t] [-r] [] [-w COUNT] [-l LOG]
  bin/logstash --modules MODULE_NAME [-M "MODULE_NAME.var.PLUGIN_TYPE.PLUGIN_NAME.VARIABLE_NAME=VALUE"] [-t] [-w COUNT] [-l LOG]
  bin/logstash -e CONFIG_STR [-t] [--log.level fatal|error|warn|info|debug|trace] [-w COUNT] [-l LOG]
  bin/logstash -i SHELL [--log.level fatal|error|warn|info|debug|trace]
  bin/logstash -V [--log.level fatal|error|warn|info|debug|trace]
  bin/logstash --help
[2021-04-15T14:35:20,917][FATAL][org.logstash.Logstash    ] Logstash stopped processing because of an error: (SystemExit) exit


pipelines 파일을 열어보겠습니다.

oepn /usr/local/etc/logstash/pipelines.yml
or
vi /usr/local/etc/logstash/pipelines.yml

* deb 또는 rpm으로 설치를 진행하면 /etc/logstash/conf.d 디렉토리에 구성파일이 배치 됩니다. *


하지만 위와 같이 설치 하지 않았기에 이전글을 따라 설치하셨다면 /usr/local/etc/logstash 경로에 배치 됩니다.


공식문서는 아래와 같습니다.

www.elastic.co/guide/en/logstash/7.x/dir-layout.html

Logstash Directory Layout | Logstash Reference [7.x] | Elastic

Logstash Docker containers do not create log files by default. They log to standard output.

www.elastic.co


많은 라인의 설정 내용이 있지만 모두 주석처리가 되어있습니다.


주석을 제거하여 pipeline.id와 path.config를 수정하였습니다. 


syslog.conf 는 조금 더 아래부분에서 새로 만들겠습니다.

# - pipeline.id: test
- pipeline.id: sample

#   path.config: "/tmp/logstash/*.config"
path.config: "/usr/local/etc/logstash/syslog.conf"


/usr/local/etc/logstash/ 경로에는 pipeline.yml 뿐만아니라 아래처럼 몇가지 파일들이 기본으로 있습니다.


logstash를 실행하려면 conf 파일이 필요한데 기본적으로 logstash-sample.conf 설정파일이 샘플로 들어있습니다.

jvm.options
log4j2.properties
logstash-sample.conf
logstash.yml
pipelines.yml
startup.options
/usr/local/etc/logstash/logstash-sample.conf


샘플 conf 파일은 아래와 같이 구성되어있습니다.

# Sample Logstash configuration for creating a simple
# Beats -> Logstash -> Elasticsearch pipeline.

input {
  beats {
    port => 5044
  }
}

output {
  elasticsearch {
    hosts => ["http://localhost:9200"]
    index => "%{[@metadata][beat]}-%{[@metadata][version]}-%{+YYYY.MM.dd}"
    #user => "elastic"
    #password => "changeme"
  }
}


기존파일도 사용가능하고 새로운 파일을 만들어서 연결도 가능합니다.


syslog.conf 파일을 만들어 보겠습니다.

vi /usr/local/etc/logstash/syslog.conf


MacOS X의 로그를 보여줄 수 있도록 file을 읽는 설정과 filter 설정으로 message를 만들었습니다.

input {
  file {
    path => [ "/var/log/*.log", "/var/log/messages", "/var/log/syslog" ]
    type => "syslog"
  }
}

filter {
  if [type] == "syslog" {
    grok {
      match => { "message" => "%{SYSLOGTIMESTAMP:syslog_timestamp} %{SYSLOGHOST:syslog_hostname} %{DATA:syslog_program}(?:\[%{POSINT:syslog_pid}\])?: %{GREEDYDATA:syslog_message}" }
      add_field => [ "received_at", "%{@timestamp}" ]
      add_field => [ "received_from", "%{host}" ]
    }
    syslog_pri { }
    date {
      match => [ "syslog_timestamp", "MMM  d HH:mm:ss", "MMM dd HH:mm:ss" ]
    }
  }
}

output {
  elasticsearch {
    hosts => ["127.0.0.1:9200"] 
    index => "syslog-demo"
  }
  stdout { codec => rubydebug }
}


새로 생성한 syslog.conf 파일의 구성을 로드 합니다.


별도 설정파일없이 -f 옵션으로 시작하고 있기 때문에 brew services 로 등록되지는 않습니다.

/usr/local/bin/logstash -f syslog.conf 
Using JAVA_HOME defined java: /Library/Java/JavaVirtualMachines/jdk-10.0.2.jdk/Contents/Home
Java HotSpot(TM) 64-Bit Server VM warning: Option UseConcMarkSweepGC was deprecated in version 9.0 and will likely be removed in a future release.
Sending Logstash logs to /usr/local/Cellar/logstash/7.12.0/libexec/logs which is now configured via log4j2.properties
[2021-04-15T12:21:23,862][INFO ][logstash.runner          ] Log4j configuration path used is: /usr/local/Cellar/logstash/7.12.0/libexec/config/log4j2.properties
[2021-04-15T12:21:23,874][INFO ][logstash.runner          ] Starting Logstash {"logstash.version"=>"7.12.0", "jruby.version"=>"jruby 9.2.13.0 (2.5.7) 2020-08-03 9a89c94bcc Java HotSpot(TM) 64-Bit Server VM 10.0.2+13 on 10.0.2+13 +indy +jit [darwin-x86_64]"}
[2021-04-15T12:21:24,004][WARN ][logstash.config.source.multilocal] Ignoring the 'pipelines.yml' file because modules or command line options are specified
[2021-04-15T12:21:24,036][INFO ][logstash.agent           ] No persistent UUID file found. Generating new UUID {:uuid=>"31d249d3-662b-4761-a658-482e72562d5c", :path=>"/usr/local/Cellar/logstash/7.12.0/libexec/data/uuid"}
[2021-04-15T12:21:24,642][INFO ][logstash.agent           ] Successfully started Logstash API endpoint {:port=>9600}
[2021-04-15T12:21:25,664][INFO ][org.reflections.Reflections] Reflections took 38 ms to scan 1 urls, producing 23 keys and 47 values 
[2021-04-15T12:21:26,763][INFO ][logstash.outputs.elasticsearch][main] Elasticsearch pool URLs updated {:changes=>{:removed=>[], :added=>[http://127.0.0.1:9200/]}}
[2021-04-15T12:21:26,924][WARN ][logstash.outputs.elasticsearch][main] Restored connection to ES instance {:url=>"http://127.0.0.1:9200/"}
[2021-04-15T12:21:27,123][INFO ][logstash.outputs.elasticsearch][main] ES Output version determined {:es_version=>7}
[2021-04-15T12:21:27,126][WARN ][logstash.outputs.elasticsearch][main] Detected a 6.x and above cluster: the `type` event field won't be used to determine the document _type {:es_version=>7}
[2021-04-15T12:21:27,137][INFO ][logstash.outputs.elasticsearch][main] New Elasticsearch output {:class=>"LogStash::Outputs::ElasticSearch", :hosts=>["//127.0.0.1:9200"]}
[2021-04-15T12:21:27,202][INFO ][logstash.outputs.elasticsearch][main] Using a default mapping template {:es_version=>7, :ecs_compatibility=>:disabled}
[2021-04-15T12:21:27,262][INFO ][logstash.outputs.elasticsearch][main] Index Lifecycle Management is set to 'auto', but will be disabled - Index Lifecycle management is not installed on your Elasticsearch cluster
[2021-04-15T12:21:27,263][INFO ][logstash.outputs.elasticsearch][main] Attempting to install template {:manage_template=>{"index_patterns"=>"logstash-*", "version"=>60001, "settings"=>{"index.refresh_interval"=>"5s", "number_of_shards"=>1}, "mappings"=>{"dynamic_templates"=>[{"message_field"=>{"path_match"=>"message", "match_mapping_type"=>"string", "mapping"=>{"type"=>"text", "norms"=>false}}}, {"string_fields"=>{"match"=>"*", "match_mapping_type"=>"string", "mapping"=>{"type"=>"text", "norms"=>false, "fields"=>{"keyword"=>{"type"=>"keyword", "ignore_above"=>256}}}}}], "properties"=>{"@timestamp"=>{"type"=>"date"}, "@version"=>{"type"=>"keyword"}, "geoip"=>{"dynamic"=>true, "properties"=>{"ip"=>{"type"=>"ip"}, "location"=>{"type"=>"geo_point"}, "latitude"=>{"type"=>"half_float"}, "longitude"=>{"type"=>"half_float"}}}}}}}
[2021-04-15T12:21:27,293][INFO ][logstash.outputs.elasticsearch][main] Installing elasticsearch template to _template/logstash
[2021-04-15T12:21:27,362][INFO ][logstash.javapipeline    ][main] Starting pipeline {:pipeline_id=>"main", "pipeline.workers"=>12, "pipeline.batch.size"=>125, "pipeline.batch.delay"=>50, "pipeline.max_inflight"=>1500, "pipeline.sources"=>["/usr/local/etc/logstash/syslog.conf"], :thread=>"#<Thread:0x39654f6f run>"}
[2021-04-15T12:21:28,430][INFO ][logstash.javapipeline    ][main] Pipeline Java execution initialization time {"seconds"=>1.07}
[2021-04-15T12:21:28,709][INFO ][logstash.inputs.file     ][main] No sincedb_path set, generating one based on the "path" setting {:sincedb_path=>"/usr/local/Cellar/logstash/7.12.0/libexec/data/plugins/inputs/file/.sincedb_7a95d797537896d7bc2d7c8449373a40", :path=>["/var/log/*.log", "/var/log/messages", "/var/log/syslog"]}
[2021-04-15T12:21:28,740][INFO ][logstash.javapipeline    ][main] Pipeline started {"pipeline.id"=>"main"}
[2021-04-15T12:21:28,774][INFO ][filewatch.observingtail  ][main][976adb32015ef413e59b22b156956b8bec525ed6230bfb57972bc53d08535932] START, creating Discoverer, Watch with file and sincedb collections
[2021-04-15T12:21:28,792][INFO ][logstash.agent           ] Pipelines running {:count=>1, :running_pipelines=>[:main], :non_running_pipelines=>[]}
{
    "syslog_severity_code" => 5,
                 "message" => "Apr 15 12:21:35 gigasui-MacBookPro Google Chrome Helper[6300]: Libnotify: notify_register_coalesced_registration failed with code 9 on line 2835",
              "syslog_pid" => "6300",
             "received_at" => "2021-04-15T03:21:36.161Z",
              "@timestamp" => 2021-04-15T03:21:35.000Z,
         "syslog_facility" => "user-level",
          "syslog_message" => "Libnotify: notify_register_coalesced_registration failed with code 9 on line 2835",
                "@version" => "1",
         "syslog_hostname" => "gigasui-MacBookPro",
                    "host" => "gigasui-MacBookPro.local",
          "syslog_program" => "Google Chrome Helper",
           "received_from" => "gigasui-MacBookPro.local",
                    "path" => "/var/log/system.log",
    "syslog_facility_code" => 1,
         "syslog_severity" => "notice",
                    "type" => "syslog",
        "syslog_timestamp" => "Apr 15 12:21:35"
}


편한 관리를 위해 brew services로 등록해보겠습니다.


pipeline.yml 에 설정된 conf 파일을 읽도록 처리가 되었기 때문에 bres services list 명령어로 상태 관리를 할 수 있습니다.

brew services start logstash


그리고 Logstash 자체도 REST API를 제공하고 있습니다.


정상적으로 실행이 되었는지 확인하기 위해 기본 설정된 9600 포트로 접속해봅니다.

curl localhost:9600/_node?pretty


Logstash설정이 완료 되었기 때문에 Kibana를 통해 시각화가 필요합니다.

설정에 되어있는 index가 자동으로 생성되지만 수동으로 등록 할 수도 있습니다.


Kibana 스택 관리 메뉴에서 index를 등록합니다.


http://localhost:5601/app/home#/


conf 파일의 output에 설정된 elasticsearch-> index 로 색인 등록을 할 수 있습니다.


syslog-demo를 입력하면 해당 인덱스를 찾았다는 문구가 보여지게 됩니다.


확인 후 Next step 버튼을 클릭합니다.


시간 필터 필드 이름으로 @timestamp 필드를 선택하고 'Create index pattern' 버특을 클릭합니다.


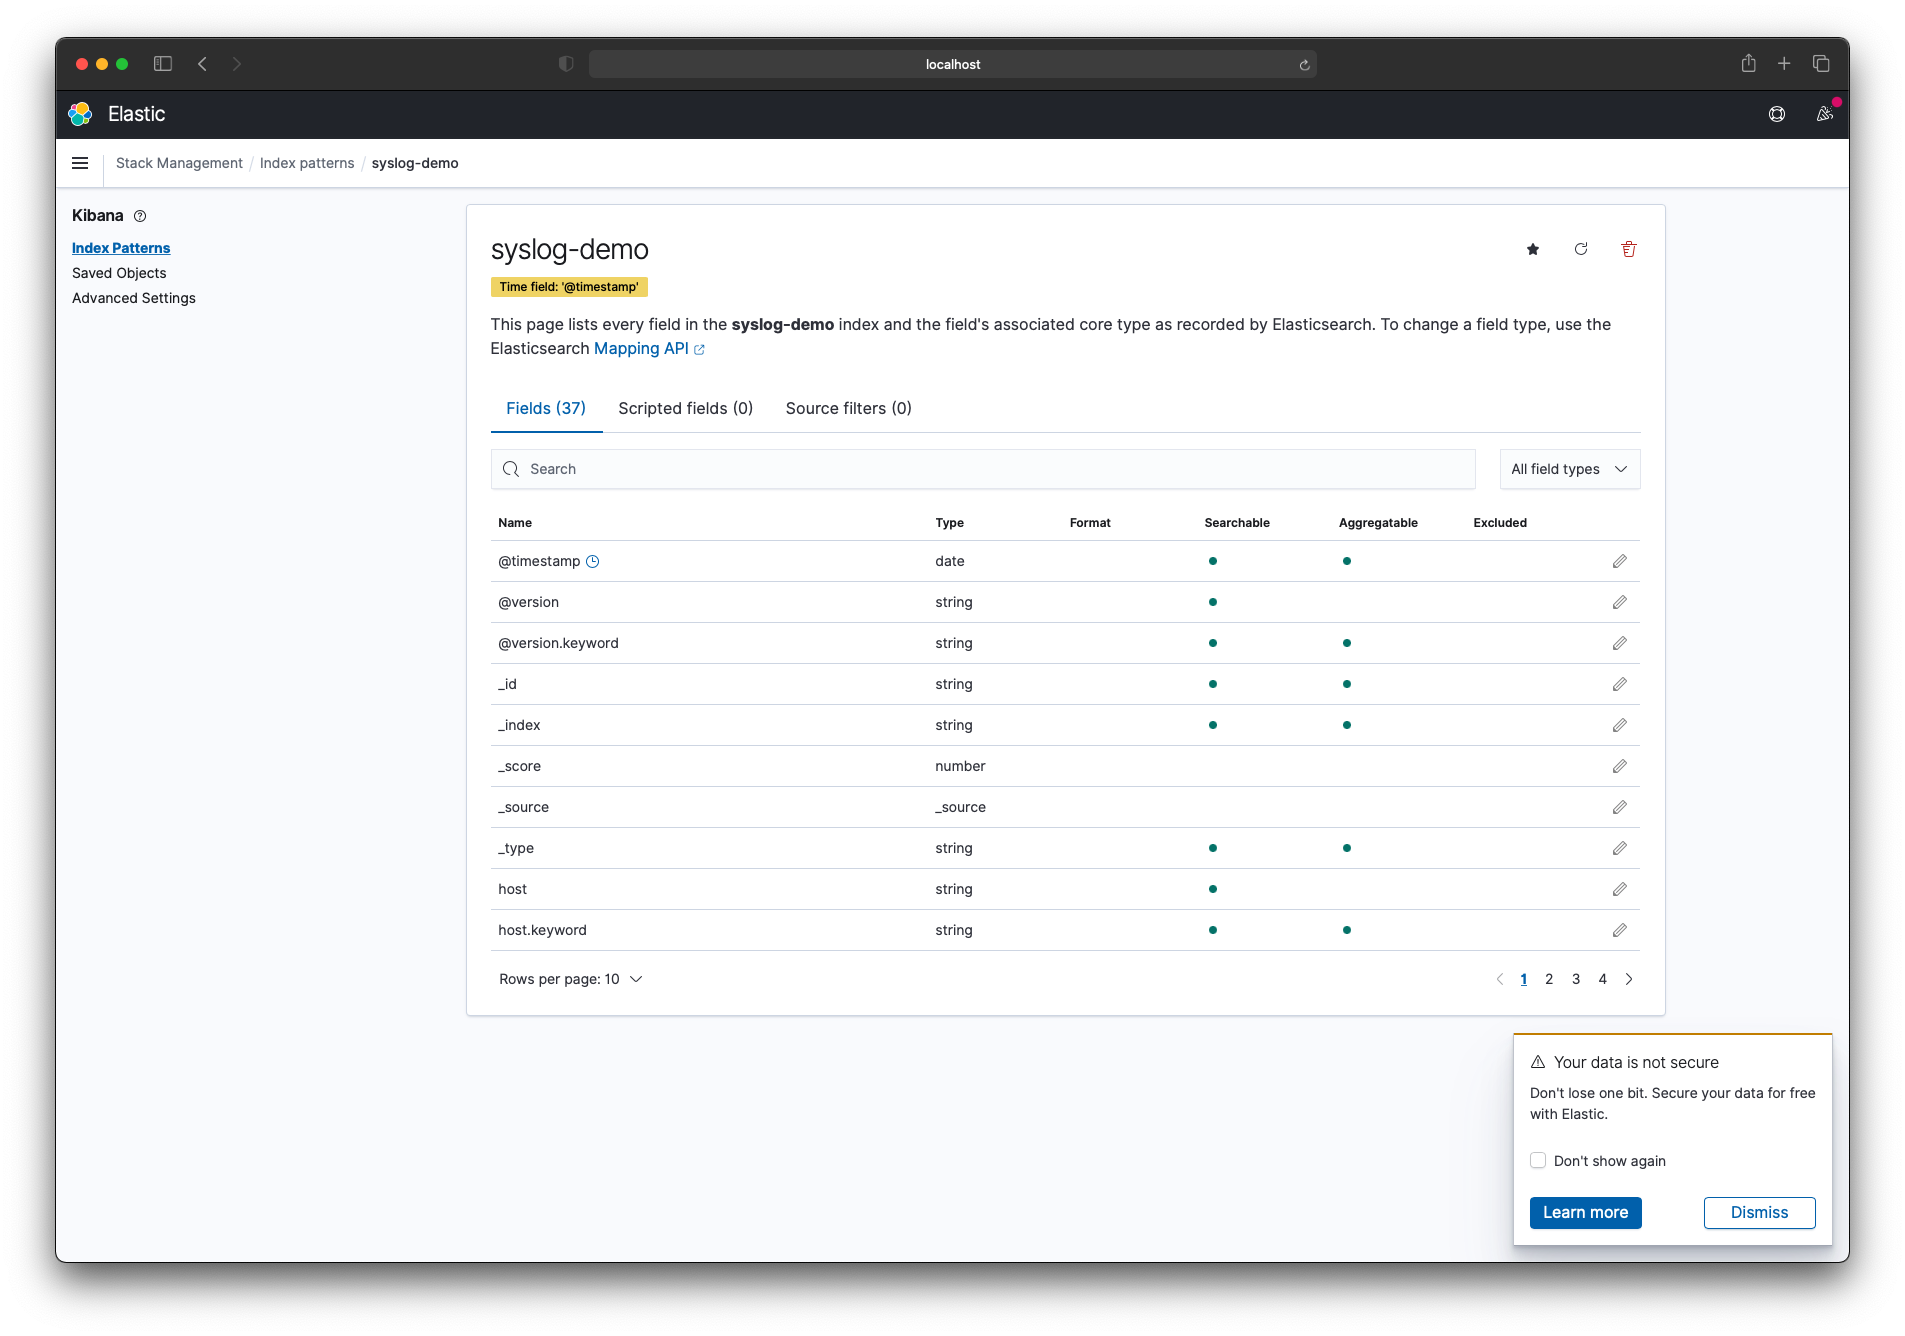
정상적으로 index pattern 등록이 되었습니다.


Discover 페이지를 열면 Kibana에서 syslog 데이터를 볼 수 있습니다.


날짜별로 필터도 가능하며 검색을 통해서 빠르게 조회가 가능합니다.


이렇게 Kibana를 통해서 로그를 시각화 하도록 구성을 해보았습니다.


728x90
반응형
728x90
반응형


어플리케이션이 구동 중 발생하는 Exception을 모니터링할 수 있는 시스템을 위해 ELK Stack 환경을 구성하려고 합니다.


ELS (ElK Stack) 구성

Java 8

Elasticsearch 7.1

Logstash 7.1

Kibana 7.1


Mac OS X에 ELK Stack을 구성해보겠습니다.


www.elastic.co/kr/


오픈 소스 검색: Elasticsearch, ELK Stack 및 Kibana 개발사 | Elastic

우리는 Elastic (ELK) Stack -- Elasticsearch, Kibana, Beats 및 Logstash를 만든 개발사입니다. 클라우드 또는 온-프레미스에서 데이터를 안전하고 안정적으로 검색하고 분석하고 시각화하세요.

www.elastic.co


Homebrew 설치

Homebrew를 사용하여 ELK를 설치 합니다.


기존 환경에 Homebrew 가 설치되어있다면 업데이트를 진행합니다.

brew update


설치하지 않았다면 터미널에서 아래의 명령어로 설치를 진행합니다.

/usr/bin/ruby -e "$(curl -fsSL https://raw.githubusercontent.com/Homebrew/install/master/install)"


Java 설치

ELK는 JVM 환경에서 동작하기 때문에 Java 설치는 필수 입니다.


최소 Java 8을 설치 해야 합니다.

www.oracle.com/java/technologies/javase/javase-jdk8-downloads.html

java -version을 확인해보니 10.0.2 버전을 사용하고 있네요.


Mac OS X 는 기본적으로 Java 가 설치되어있음으로 해당 명령어로 현재 버전을 확인할 수 있습니다.

java -version

java version "10.0.2" 2018-07-17
Java(TM) SE Runtime Environment 18.3 (build 10.0.2+13)
Java HotSpot(TM) 64-Bit Server VM 18.3 (build 10.0.2+13, mixed mode)


공식 사이트 내용을 보면 Logstash는 Java9를 지원하지 않기 때문에 Java8을 맞춰줘야 됩니다.


만약 다른 Java 버전을 사용한다면 brew services에 등록된 상태를 보면 error로 보여집니다. (pipeline.yml 에서 오류가 발생하여 start가 안되던 문제였습니다.)


www.elastic.co/guide/kr/logstash/current/installing-logstash.html


Logstash 설치 | Logstash 참조 [5.4] | Elastic

앞서 설명한 echo 메서드를 사용하여 Logstash 리포지토리를 추가합니다. add-apt-repository`는 사용하지 마십시오. 이는 `deb-src 항목도 추가하는데 소스 패키지가 제공되지 않습니다. deb-src 항목을 추가

www.elastic.co

Logstash에는 Java 8이 필요합니다. Java 9는 지원되지 않습니다. official Oracle distribution 또는 오픈소스 배포판(예: OpenJDK)을 사용합니다.


vi 편집기나 open 명령어로 파일을 열어서 JAVA_HOME 환경변수를 Java 8로 변경하였습니다.

open ~/.bash_profile
or
vi ~/.bash_profile
export JAVA_HOME=/Library/Java/JavaVirtualMachines/jdk1.8.0_181.jdk/Contents/Home


source 명령어를 통해 환경변수를 다시 로드 합니다.

source ~/.bash_profile


Elasticsearch 설치

www.elastic.co/kr/downloads/past-releases/elasticsearch-7-2-0


Elasticsearch 7.2.0 | Elastic

View the detailed release notes here. Not the version you're looking for? View past releases. The pure Apache 2.0 licensed distribution is available here. The distribution that's not bundled with a JDK is available here. You can obtain the source code for

www.elastic.co

기본 환경이 만들어졌다면 Elasticsearch 아래의 명령어로 구성 요소 설치를 진행합니다.


Elasticsearch는 데이터 저장소 및 검색엔진 역할을 합니다.

brew install elasticsearch && brew info elasticsearch


Homebrew로 Elasticsearch 를 시작합니다.

brew services start elasticsearch
==> Tapping homebrew/services
Cloning into '/usr/local/Homebrew/Library/Taps/homebrew/homebrew-services'...
remote: Enumerating objects: 34, done.
remote: Counting objects: 100% (34/34), done.
remote: Compressing objects: 100% (24/24), done.
remote: Total 1155 (delta 13), reused 13 (delta 9), pack-reused 1121
Receiving objects: 100% (1155/1155), 335.91 KiB | 5.17 MiB/s, done.
Resolving deltas: 100% (490/490), done.
Tapped 1 command (41 files, 425.7KB).
==> Successfully started `elasticsearch` (label: homebrew.mxcl.elasticsearch)


터미널을 통해 curl 명령어로 접속하거나 브라우저를 통해 http://localhost:9200 으로 접속하면 아래와 같이 출력됩니다.

curl -X GET localhost:9200
{
  "name" : "gigasui-MacBookPro.local",
  "cluster_name" : "elasticsearch_brew",
  "cluster_uuid" : "8TGDIm0lT6-IjUmdz29zig",
  "version" : {
    "number" : "7.10.1-SNAPSHOT",
    "build_flavor" : "oss",
    "build_type" : "tar",
    "build_hash" : "unknown",
    "build_date" : "2020-12-09T19:28:12.431816Z",
    "build_snapshot" : true,
    "lucene_version" : "8.7.0",
    "minimum_wire_compatibility_version" : "6.8.0",
    "minimum_index_compatibility_version" : "6.0.0-beta1"
  },
  "tagline" : "You Know, for Search"
}


Logstash 설치

www.elastic.co/kr/downloads/past-releases/logstash-7-2-0


Logstash 7.2.0 | Elastic

View the detailed release notes here.

www.elastic.co

이번엔 아래의 명령어로 Logstash 설치를 진행합니다.


Logstash는 데이터 수집, 필터링, Elasticsearch에 색인하는 역할을 합니다.

brew install logstash


아직 Logstash 파이프라인을 구성하지 않아서 의미가 없지만 아래에서 구성을 진행하도록 하겠습니다.

brew services start logstash
==> Successfully started `logstash` (label: homebrew.mxcl.logstash)


Kibana 설치

www.elastic.co/kr/downloads/past-releases/kibana-7-2-0


Kibana 7.2.0 | Elastic

View the detailed release notes here.

www.elastic.co

ELK의 마지막 구성 요소인 Kibana를 설치하겠습니다.


Kibana는 수집된 데이터를 시각화 해주는 역할을 합니다.


아래의 명령어를 통해 Kibana 설치를 진행합니다.

brew install kibana


Kibana를 실행합니다.

brew services start kibana
==> Successfully started `kibana` (label: homebrew.mxcl.kibana)


Kibana를 시작하고 모든 ELK 서비스가 실행 중인지 확인합니다.


logstash 서비스 상태는 error로 나오는데 다음글에서 다루겠습니다.

brew services list
Name          Status  User  Plist
elasticsearch started gigas /Users/gigas/Library/LaunchAgents/homebrew.mxcl.elasticsearch.plist
kibana        started gigas /Users/gigas/Library/LaunchAgents/homebrew.mxcl.kibana.plist
logstash      error   gigas /Users/gigas/Library/LaunchAgents/homebrew.mxcl.logstash.plist


Kibana를 접속하려면 설정을 변경해야합니다.


Kibana 설정이 있는 kibana.yml 파일을 열어줍니다.

sudo vi /usr/local/etc/kibana/kibana.yml


server.port 와 elasticsearch.hosts 라인의 주석을 해제 합니다.


기본값으로 진행을 하지만 서버 환경에 맞는 설정으로 수정하면 됩니다.

server.port: 5601
elasticsearch.hosts: ["http://localhost:9200"]


기본적으로 Kibana server.host는 localhost 로 되어있습니다.


외부접속을 허용할 수 있도록 server.host="localhost" 주석을 해제하고 특정 ip를 허용하면 됩니다.


0.0.0.0 으로 모든 ip를 허용하도록 처리해보겠습니다.

server.host: "0.0.0.0"


수정 뒤 Kibana를 재시작 합니다.

brew services restart kibana


설정 수정이 완료되었다면 Kibana 상태를 보여주는 페이지이동해 봅니다.


정상적으로 설정이 되었다면 아래처럼 페이지 내용이 보여집니다.

http://localhost:5601/status


이것으로 기본적은 설치를 마무리 하였습니다.


728x90
반응형
728x90
반응형


최초에 서버 설치를 진행했다면 운영체제 정보도 알 수 있겠지만 기존에 설치되어있는 정보가 궁금할 수 있습니다.


현재 설치되어있는 운영체제가 어떤것인지 알아야 환경에 맞는 설정을 할 수 있습니다.


커널 정보

Linux의 커널 정보를 보여줍니다.

cat /proc/version

Linux version 3.10.105 (root@build4) (gcc version 4.9.3 20150311 (prerelease) (crosstool-NG 1.20.0) ) #25556 SMP Thu Mar 4 18:00:29 CST 2021


시스템 정보

uname 명령어로 시스템 정보를 확인할 수 있습니다.


옵션은 아래와 같습니다.


옵션이 없을 경우 -s옵션과 같은 결과를 출력합니다.

  • -a, --all : 모든 정보를 출력
  • -s, --kernel-name : 커널 이름을 출력
  • -n, --nodename : 네트워크 노드의 호스트 이름
  • -r, --kernel-release : 커널 release 번호
  • -v, --kernel-version : 커널 버전번호
  • -m, --machine : 하드웨어 이름
  • -p, --processor : 프로세서 타입
  • -i, --hardware-platform : 하드웨어 플렛폼정보
  • -o, --operating-system : 운영체제 정보
uname -a

Linux centos 3.10.105 #25556 SMP Thu Mar 4 18:00:29 CST 2021 x86_64 x86_64 x86_64 GNU/Linux


Linux 배포 정보

centos-release

redhat-release

os-release

system-release

cat /etc/*release

CentOS Linux release 7.6.1810 (Core)                                                                                                   
NAME="CentOS Linux"                                                                                                                    
VERSION="7 (Core)"                                                                                                                     
ID="centos"                                                                                                                            
ID_LIKE="rhel fedora"                                                                                                                  
VERSION_ID="7"                                                                                                                         
PRETTY_NAME="CentOS Linux 7 (Core)"                                                                                                    
ANSI_COLOR="0;31"                                                                                                                      
CPE_NAME="cpe:/o:centos:centos:7"                                                                                                      
HOME_URL="https://www.centos.org/"                                                                                                     
BUG_REPORT_URL="https://bugs.centos.org/"                                                                                              
                                                                                                                                       
CENTOS_MANTISBT_PROJECT="CentOS-7"                                                                                                     
CENTOS_MANTISBT_PROJECT_VERSION="7"                                                                                                    
REDHAT_SUPPORT_PRODUCT="centos"                                                                                                        
REDHAT_SUPPORT_PRODUCT_VERSION="7"                                                                                                     
                                                                                                                                       
CentOS Linux release 7.6.1810 (Core)                                                                                                   
CentOS Linux release 7.6.1810 (Core) 


위와같은 명령어를 통해 Linux 운영체제 및 버전 확인 방법을 알아보았습니다.


728x90
반응형
728x90
반응형


iOS 에서 NavigationViewController 를 사용하면 다양한 옵션들이 있습니다.


기본 옵션이지만 상당히 부드럽고 깔끔하죠.


Flutter로 개발을 하는 이유는 Android에도 iOS처럼 부드러운 애니메이션 작업이 가능하다는 겁니다.


iOS스러운 앱을 만들기 위해 작은 예제를 정리하도록 하겠습니다.


첫번째로는 iOS 에서 지원하는 LargeTitle NavigationBar 기능을 Flutter로 구현해 보겠습니다.

Navigation Bar Title


Scroll시 Large Title에 NavigationBar 에 올려진다


하나의 StatelessWidget 클래스를 상속하는 Page 클래스를 만들어 줍니다.


Scaffold를 리턴해줘야 흰색 배경이 나옵니다.

class ExmaplePage extends StatelessWidget {
	@override
	Widget build(BuildContext context) {
  		return Scaffold();
  	}
}


Scaffold의 속성중 body에 NestedScrollView를 넣어줍니다.


NestedScrollView 속성에는 headerSliverBuilder가 있는데 이부분에서 CupertinoSliverNavigationBar 위젯을 사용하면 됩니다.


NestedScrollView를 감싼다음 body에는 기존에 사용하던 코드를 넣어주면 iOS처럼 멋진 디자인이 보여집니다.

class ExamplePage extends StatelessWidget {
  @override
  Widget build(BuildContext context) {
    return Scaffold(
      body: NestedScrollView(
        headerSliverBuilder: (context, innerBoxIsScrolled) {
          return [
            CupertinoSliverNavigationBar(
              largeTitle: Text('Example'),
            ),
          ];
        },
        body: Center(
          child: Text("ExamplePage"),
        ),
      ),
    );
  }
}


NestedScrollView 또한 physics 속성이 있으니 BouncingScrollPhysics()코드를 넣어 효과를 넣을수도 있습니다.


이렇게 기존 iOS 네이티브 디자인을 Flutter코드로 작성해보았습니다.


728x90
반응형
728x90
반응형


저축은행 업무를 하면서 많은 솔루션을 사용합니다.


정말로 앱 하나에 10개 이상은 들어가는것 같습니다.


이게 앱을 만드는건지 솔루션을 합치는건지 모를정도로 다양한 솔루션을 사용합니다.


어느 기업의 솔루션을 받아서 사용하는데 개발사는 하청 업체가 진행하는것이 다반사 입니다.


같은 업체의 솔루션이지만 다른 하청업체에서 개발하기 때문에 서로 충돌도 많이 생기는데요.


이번경우는 다른 기능이지만 같은 기능들이 많아서 충돌이 되는 문제였습니다.


xcode 빌드시 아래처럼 중복된 코드들이 있다는 오류가 보여지고 있었습니다.


같은 회사 솔루션인데 왜 이렇게 만드는지는 모르겠으나.. 병합 처리를 해서 사용하려고 합니다.

duplicate symbol '_OBJC_CLASS_$_xxxxxx' in:
	/Users/gigas/Documents/IOS/xxxx/a.a (c.o)
    /Users/gigas/Documents/IOS/xxxx/b.a (c.o)


libtool 프로그래밍 도구를 통해 병합을 진행합니다.


Libtool은 GNU 빌드 시스템에서 나온 GNU 프로그래밍 도구이며 포터블 라이브러리를 만드는 사용합니다.


www.gnu.org/software/libtool/


Libtool - GNU Project - Free Software Foundation

GNU Libtool - The GNU Portable Library Tool GNU Libtool is a generic library support script that hides the complexity of using shared libraries behind a consistent, portable interface. To use Libtool, add the new generic library building commands to your

www.gnu.org


a.a, b.a 파일을 한곳에 모아두고 해당 경로로 들어가서 아래와 같은 명령어를 입력하면 됩니다.


a.a 파일과 b.a 파일을 병합하여 merge.a 라는 파일로 만들어 줍니다.

libtool -static -o ./merge.a ./a.a ./b.a 


이렇게 생성된 merge.a 라이브러리 파일을 사용하니 문제 없이 빌드가 잘 되었습니다.


libtool에 많은 옵션들이 있지만 단순 병합하는 용도로 설명을 하였습니다.


728x90
반응형
728x90
반응형


# OS환경은 CentOS 7.0으로 진행되었습니다.


이전글에서 nginx를 설치 하였습니다.


nginx의 기본 설정을 확인해 보겠습니다.


http 속성은 /etc/nginx/nginx.conf 에 있습니다.

[root@NGINX /]# vi /etc/nginx/nginx.conf  
user  nginx;                                                                                                                                     
worker_processes  1;                                                                                                                             
                                                                                                                                                 
error_log  /var/log/nginx/error.log warn;                                                                                                        
pid        /var/run/nginx.pid;                                                                                                                   
                                                                                                                                                 
                                                                                                                                                 
events {                                                                                                                                         
    worker_connections  1024;                                                                                                                    
}                                                                                                                                                
                                                                                                                                                 
                                                                                                                                                 
http {                                                                                                                                           
    include       /etc/nginx/mime.types;                                                                                                         
    default_type  application/octet-stream;                                                                                                      
                                                                                                                                                 
    log_format  main  '$remote_addr - $remote_user [$time_local] "$request" '                                                                    
                      '$status $body_bytes_sent "$http_referer" '                                                                                
                      '"$http_user_agent" "$http_x_forwarded_for"';                                                                              
                                                                                                                                                 
    access_log  /var/log/nginx/access.log  main;                                                                                                 
                                                                                                                                                 
    sendfile        on;                                                                                                                          
    #tcp_nopush     on;                                                                                                                          
                                                                                                                                                 
    keepalive_timeout  65;                                                                                                                       
                                                                                                                                                 
    #gzip  on;                                                                                                                                   
                                                                                                                                                 
    include /etc/nginx/conf.d/*.conf;                                                                                                            
} 


server 속성은 /etc/nginx/conf.d/default.conf 에 있습니다.


아래의 경로에 있는 default.conf 파일을 열어봅니다.

[root@NGINX /]# vi /etc/nginx/conf.d/default.conf  


현재 보여지는 설정은 기본 설치 후 설정입니다.


각종 설정들이 주석처리 되어있지만 필요에 의해 주석을 해제하고 사용하면 됩니다.

server {                                                                                                                                         
    listen       80;                                                                                                                             
    server_name  localhost;                                                                                                                      
                                                                                                                                                 
    #charset koi8-r;                                                                                                                             
    #access_log  /var/log/nginx/host.access.log  main;                                                                                           
                                                                                                                                                 
    location / {                                                                                                                                 
        root   /usr/share/nginx/html;                                                                                                            
        index  index.html index.htm;                                                                                                             
    }                                                                                                                                            
                                                                                                                                                 
    #error_page  404              /404.html;                                                                                                     
                                                                                                                                                 
    # redirect server error pages to the static page /50x.html                                                                                   
    #                                                                                                                                            
    error_page   500 502 503 504  /50x.html;                                                                                                     
    location = /50x.html {                                                                                                                       
        root   /usr/share/nginx/html;                                                                                                            
    }                                                                                                                                            
                                                                                                                                                 
    # proxy the PHP scripts to Apache listening on 127.0.0.1:80                                                                                  
    #                                                                                                                                            
    #location ~ \.php$ {                                                                                                                         
    #    proxy_pass   http://127.0.0.1;                                                                                                          
    #}                                                                                                                                           
                                                                                                                                                 
    # pass the PHP scripts to FastCGI server listening on 127.0.0.1:9000                                                                         
    #                                                                                                                                            
    #location ~ \.php$ {                                                                                                                         
    #    root           html;                                                                                                                    
    #    fastcgi_pass   127.0.0.1:9000;                                                                                                          
    #    fastcgi_index  index.php;                                                                                                               
    #    fastcgi_param  SCRIPT_FILENAME  /scripts$fastcgi_script_name;                                                                           
    #    include        fastcgi_params;                                                                                                          
    #}                                                                                                                                           
                                                                                                                                                 
    # deny access to .htaccess files, if Apache's document root                                                                                  
    # concurs with nginx's one                                                                                                                   
    #                                                                                                                                            
    #location ~ /\.ht {                                                                                                                          
    #    deny  all;                                                                                                                              
    #}                                                                                                                                           
} 


80포트로 방화벽이 걸려있으면 아래와 같이 80포트 방화벽을 열어줍니다.

firewall-cmd --permanent --zone=public --add-port=80/tcp 
firewall-cmd --permanent --zone=public --add-service=http
firewall-cmd --permanent --zone=public --add-service=https


nginx 자동시작 설정을 합니다.

systemctl enable nginx
[root@NGINX /]# systemctl enable nginx                                                                                                           
Created symlink /etc/systemd/system/multi-user.target.wants/nginx.service, pointing to /usr/lib/systemd/system/nginx.service.


nginx를 시작합니다.

systemctl start nginx


방화벽을 reload합니다.

firewall-cmd --reload


그외 명령어와 설정파일들 위치 입니다.


- nginx 관련 명령어

서버 시작 : sudo systemctl start nginx

서버 자동 시작 등록 : sudo systemctl enable nginx

서버 상태 확인 : sudo systemctl status nginx

서버 정지 : sudo systemctl stop nginx

서버 재시작 : sudo systemctl restart nginx

설정 리로드 : sudo systemctl reload nginx


- nginx 설정파일

/etc/nginx/ : nginx 설정파일 디렉토리

/etc/nginx/nginx.conf : 메인 설정파일(접속자 수, 동작 프로세스 수 등 퍼포먼스에 대한 설정)

/etc/nginx/conf.d/ : nginx.conf에서 불러들일 수 있는 파일 저장

/etc/nginx/fastcgi.conf : FastCGI 환경설정 파일

/etc/nginx/sites-available/ : 비활성화된 사이트 파일

/etc/nginx/sites-enabled/ : 활성화된 사이트 파일

728x90
반응형
728x90
반응형

# Xcode11 Version 11.6 (11E708) 을 사용하고 있습니다.


은행권 보안 솔루션을 적용중에 아래와 같은 오류가 발생하였습니다.


ld: '/Users/gigas/Documents/...)' does not contain bitcode. You must rebuild it with bitcode enabled (Xcode setting ENABLE_BITCODE), obtain an updated library from the vendor, or disable bitcode for this target. for architecture arm64


BITCODE는 ios9에서부터 앱 용량을 줄여주는 App Thining과 밀접한 관계가 있습니다.


App Store에 등록할 때 bitcode 활성화 상태로 올라가서 Apple이 32bit, 64bit 를 구분하여 용량을 줄이도록 제공한다고 합니다.


보안 솔루션 업체에서 오래전에 만들어둔 수정 보완을 거치지 않고 납품을 많이 하는지 BITCODE 관련해서 처리가 되어있지 않았습니다.


이를 해결하려면 보안 솔루션 업체에서 BITCODE를 포함하여 빌드를 해주는 방법이 있습니다.


하지만 이렇게 간단하게 된다면 저런 모듈을 주지 않았겠죠..


업체와 문제 해결방법을 찾기보단 프로젝트 설정을 건드는것으로 처리하려고 합니다.


Build Settings 에서 Build Options 의 Enable Bitcode 값이 기본은 Yes지만 No로 변경하면 정상적으로 Build가 됩니다.


은행권 프로젝트를 하면 솔루션 작업에 어려움이 많습니다.


다른 업체별로 맞는 환경을 맞춰야하는데 언제쯤 이런 수고를 덜수 있을까요..


728x90
반응형
728x90
반응형


WebView를 구현할 때 onReceivedSslError 오류를 무시하거나 구현하지 않고 PlayConsole에 출시를 하면 아래와 같이 업데이트 거부가 됩니다.


Play Console에 표시된 기한이 지난 후에도 보안 취약점이 수정되지 않은 앱은 모두 삭제가 되니 필수로 체크를 해야합니다.


PlayConsole에 들어가보면 아래와같이 경고 문구가 보여집니다.


관리자 이메일로 들어갔을때 정확한 오류문구와 해결을 위한 link가 있기 때문에 어렵지 않게 처리할 수 있습니다.

https://support.google.com/faqs/answer/7071387?hl=ko


앱의 WebView SSL 오류 핸들러 알림 해결 방법 - Google 고객센터

도움이 되었나요? 어떻게 하면 개선할 수 있을까요? 예아니요

support.google.com


WebChromeClient 를 설정하는 곳에서 onReceivedSslError 메서드를 override합니다.


인증서가 요구사항을 충족할 때 proceed()를 호출하고 그렇지 않으면 cancel()을 호출하는 코드를 작성하면 됩니다.

override fun onReceivedSslError(view: WebView?, handler: SslErrorHandler?, error: SslError?) {
    val builder: AlertDialog.Builder = AlertDialog.Builder(context)
    builder.setMessage("이 사이트의 보안 인증서는 신뢰하는 보안 인증서가 아닙니다. 계속하시겠습니까?")
    builder.setPositiveButton("계속하기", object: DialogInterface.OnClickListener {
        override fun onClick(p0: DialogInterface?, p1: Int) {
            handler!!.proceed()
        }
    })
    builder.setNegativeButton("취소", object: DialogInterface.OnClickListener {
        override fun onClick(p0: DialogInterface?, p1: Int) {
            handler!!.cancel()
        }
    })
    val dialog: AlertDialog = builder.create()
    dialog.show()
}


lambda 식으로 처리한다면 더 짧게 구현할 수 있습니다.

override fun onReceivedSslError(view: WebView?, handler: SslErrorHandler?, error: SslError?) {
    val builder: AlertDialog.Builder = AlertDialog.Builder(context)
    builder.setMessage("이 사이트의 보안 인증서는 신뢰하는 보안 인증서가 아닙니다. 계속하시겠습니까?")
    builder.setPositiveButton("계속하기") { _, _ -> handler!!.proceed() }
    builder.setNegativeButton("취소") { _, _ -> handler!!.cancel() }
    val dialog: AlertDialog = builder.create()
    dialog.show()
}


WebView SSL을 사용하는 모든 앱에 영향을 주는것이 아니지만 보안 정책을 준수하도록 권장하고 있습니다.


취약점이 발생이 되면 개발자 배포 계약을 위반하는 제품으로 간주될 수 있다고 하니 주의해야겠습니다.


728x90
반응형
728x90
반응형

# OS환경은 CentOS 7.0으로 진행되었습니다.


CentOS7에 웹서버 Nginx를 설치해보도록 하겠습니다.


아래의 명령어로 firewall을 설치를 시작합니다.


정상적으로 설치가 완료되면 Complete! 문자가 출력됩니다.

yum install firewalld
[root@NGINX /]# yum install firewalld                                                                                                            
Loaded plugins: fastestmirror, ovl                                                                                                               
Loading mirror speeds from cached hostfile                                                                                                       
 * base: mirror.kakao.com                                                                                                                        
 * extras: mirror.kakao.com                                                                                                                      
 * updates: mirror.kakao.com                                                                                                                     
Resolving Dependencies                                                                                                                           
--> Running transaction check                                                                                                                    
---> Package firewalld.noarch 0:0.6.3-8.el7_8.1 will be installed                                                                                
--> Processing Dependency: python-firewall = 0.6.3-8.el7_8.1 for package: firewalld-0.6.3-8.el7_8.1.noarch                                       
--> Processing Dependency: firewalld-filesystem = 0.6.3-8.el7_8.1 for package: firewalld-0.6.3-8.el7_8.1.noarch                                  
--> Processing Dependency: iptables for package: firewalld-0.6.3-8.el7_8.1.noarch                                                                
--> Processing Dependency: ipset for package: firewalld-0.6.3-8.el7_8.1.noarch                                                                   
--> Processing Dependency: ebtables for package: firewalld-0.6.3-8.el7_8.1.noarch                                                                
--> Running transaction check                                                                                                                    
---> Package ebtables.x86_64 0:2.0.10-16.el7 will be installed                                                                                   
---> Package firewalld-filesystem.noarch 0:0.6.3-8.el7_8.1 will be installed                                                                     
---> Package ipset.x86_64 0:7.1-1.el7 will be installed                                                                                          
--> Processing Dependency: ipset-libs(x86-64) = 7.1-1.el7 for package: ipset-7.1-1.el7.x86_64                                                    
--> Processing Dependency: libipset.so.13(LIBIPSET_4.8)(64bit) for package: ipset-7.1-1.el7.x86_64                                               
--> Processing Dependency: libipset.so.13(LIBIPSET_2.0)(64bit) for package: ipset-7.1-1.el7.x86_64                                               
--> Processing Dependency: libipset.so.13()(64bit) for package: ipset-7.1-1.el7.x86_64                                                           
---> Package iptables.x86_64 0:1.4.21-34.el7 will be installed                                                                                   
--> Processing Dependency: libnfnetlink.so.0()(64bit) for package: iptables-1.4.21-34.el7.x86_64                                                 
--> Processing Dependency: libnetfilter_conntrack.so.3()(64bit) for package: iptables-1.4.21-34.el7.x86_64                                       
---> Package python-firewall.noarch 0:0.6.3-8.el7_8.1 will be installed                                                                          
--> Processing Dependency: python-slip-dbus for package: python-firewall-0.6.3-8.el7_8.1.noarch                                                  
--> Processing Dependency: python-decorator for package: python-firewall-0.6.3-8.el7_8.1.noarch                                                  
--> Running transaction check                                                                                                                    
---> Package ipset-libs.x86_64 0:7.1-1.el7 will be installed                                                                                     
--> Processing Dependency: libmnl.so.0(LIBMNL_1.0)(64bit) for package: ipset-libs-7.1-1.el7.x86_64                                               
--> Processing Dependency: libmnl.so.0()(64bit) for package: ipset-libs-7.1-1.el7.x86_64                                                         
---> Package libnetfilter_conntrack.x86_64 0:1.0.6-1.el7_3 will be installed                                                                     
---> Package libnfnetlink.x86_64 0:1.0.1-4.el7 will be installed                                                                                 
---> Package python-decorator.noarch 0:3.4.0-3.el7 will be installed                                                                             
---> Package python-slip-dbus.noarch 0:0.4.0-4.el7 will be installed                                                                             
--> Processing Dependency: python-slip = 0.4.0-4.el7 for package: python-slip-dbus-0.4.0-4.el7.noarch                                            
--> Running transaction check                                                                                                                    
---> Package libmnl.x86_64 0:1.0.3-7.el7 will be installed                                                                                       
---> Package python-slip.noarch 0:0.4.0-4.el7 will be installed                                                                                  
--> Processing Dependency: libselinux-python for package: python-slip-0.4.0-4.el7.noarch                                                         
--> Running transaction check                                                                                                                    
---> Package libselinux-python.x86_64 0:2.5-15.el7 will be installed                                                                             
--> Finished Dependency Resolution 

Dependencies Resolved                                                                                                                            
                                                                                                                                                 
=================================================================================================================================================
 Package                                     Arch                        Version                              Repository                    Size 
=================================================================================================================================================
Installing:                                                                                                                                      
 firewalld                                   noarch                      0.6.3-8.el7_8.1                      updates                      443 k 
Installing for dependencies:                                                                                                                     
 ebtables                                    x86_64                      2.0.10-16.el7                        base                         123 k 
 firewalld-filesystem                        noarch                      0.6.3-8.el7_8.1                      updates                       51 k 
 ipset                                       x86_64                      7.1-1.el7                            base                          39 k 
 ipset-libs                                  x86_64                      7.1-1.el7                            base                          64 k 
 iptables                                    x86_64                      1.4.21-34.el7                        base                         432 k 
 libmnl                                      x86_64                      1.0.3-7.el7                          base                          23 k 
 libnetfilter_conntrack                      x86_64                      1.0.6-1.el7_3                        base                          55 k 
 libnfnetlink                                x86_64                      1.0.1-4.el7                          base                          26 k 
 libselinux-python                           x86_64                      2.5-15.el7                           base                         236 k 
 python-decorator                            noarch                      3.4.0-3.el7                          base                          27 k 
 python-firewall                             noarch                      0.6.3-8.el7_8.1                      updates                      354 k 
 python-slip                                 noarch                      0.4.0-4.el7                          base                          31 k 
 python-slip-dbus                            noarch                      0.4.0-4.el7                          base                          32 k 
                                                                                                                                                 
Transaction Summary                                                                                                                              
=================================================================================================================================================
Install  1 Package (+13 Dependent packages)                                                                                                      
                                                                                                                                                 
Total download size: 1.9 M                                                                                                                       
Installed size: 6.8 M                                                                                                                            
Is this ok [y/d/N]: y                                                                                                                            
Downloading packages:                                                                                                                            
(1/14): ebtables-2.0.10-16.el7.x86_64.rpm                                                                                 | 123 kB  00:00:00     
(2/14): firewalld-filesystem-0.6.3-8.el7_8.1.noarch.rpm                                                                   |  51 kB  00:00:00     
(3/14): ipset-libs-7.1-1.el7.x86_64.rpm                                                                                   |  64 kB  00:00:00     
(4/14): ipset-7.1-1.el7.x86_64.rpm                                                                                        |  39 kB  00:00:00     
(5/14): firewalld-0.6.3-8.el7_8.1.noarch.rpm                                                                              | 443 kB  00:00:00     
(6/14): iptables-1.4.21-34.el7.x86_64.rpm                                                                                 | 432 kB  00:00:00     
(7/14): libmnl-1.0.3-7.el7.x86_64.rpm                                                                                     |  23 kB  00:00:00     
(8/14): libnetfilter_conntrack-1.0.6-1.el7_3.x86_64.rpm                                                                   |  55 kB  00:00:00     
(9/14): libnfnetlink-1.0.1-4.el7.x86_64.rpm                                                                               |  26 kB  00:00:00     
(10/14): python-decorator-3.4.0-3.el7.noarch.rpm                                                                          |  27 kB  00:00:00     
(11/14): libselinux-python-2.5-15.el7.x86_64.rpm                                                                          | 236 kB  00:00:00     
(12/14): python-slip-0.4.0-4.el7.noarch.rpm                                                                               |  31 kB  00:00:00     
(13/14): python-slip-dbus-0.4.0-4.el7.noarch.rpm                                                                          |  32 kB  00:00:00     
(14/14): python-firewall-0.6.3-8.el7_8.1.noarch.rpm                                                                       | 354 kB  00:00:00     
-------------------------------------------------------------------------------------------------------------------------------------------------
Total                                                                                                            2.8 MB/s | 1.9 MB  00:00:00     
Running transaction check                                                                                                                        
Running transaction test                                                                                                                         
Transaction test succeeded                                                                                                                       
Running transaction                                                                                                                              
  Installing : python-decorator-3.4.0-3.el7.noarch                                                                                          1/14 
  Installing : libmnl-1.0.3-7.el7.x86_64                                                                                                    2/14 
  Installing : libnfnetlink-1.0.1-4.el7.x86_64                                                                                              3/14 
  Installing : libnetfilter_conntrack-1.0.6-1.el7_3.x86_64                                                                                  4/14 
  Installing : iptables-1.4.21-34.el7.x86_64                                                                                                5/14 
  Installing : ipset-libs-7.1-1.el7.x86_64                                                                                                  6/14 
  Installing : ipset-7.1-1.el7.x86_64                                                                                                       7/14 
  Installing : ebtables-2.0.10-16.el7.x86_64                                                                                                8/14 
  Installing : firewalld-filesystem-0.6.3-8.el7_8.1.noarch                                                                                  9/14 
  Installing : libselinux-python-2.5-15.el7.x86_64                                                                                         10/14 
  Installing : python-slip-0.4.0-4.el7.noarch                                                                                              11/14 
  Installing : python-slip-dbus-0.4.0-4.el7.noarch                                                                                         12/14 
  Installing : python-firewall-0.6.3-8.el7_8.1.noarch                                                                                      13/14 
  Installing : firewalld-0.6.3-8.el7_8.1.noarch                                                                                            14/14 
  Verifying  : ipset-7.1-1.el7.x86_64                                                                                                       1/14 
  Verifying  : libnfnetlink-1.0.1-4.el7.x86_64                                                                                              2/14 
  Verifying  : python-firewall-0.6.3-8.el7_8.1.noarch                                                                                       3/14 
  Verifying  : libmnl-1.0.3-7.el7.x86_64                                                                                                    4/14 
  Verifying  : iptables-1.4.21-34.el7.x86_64                                                                                                5/14 
  Verifying  : firewalld-0.6.3-8.el7_8.1.noarch                                                                                             6/14 
  Verifying  : libselinux-python-2.5-15.el7.x86_64                                                                                          7/14 
  Verifying  : firewalld-filesystem-0.6.3-8.el7_8.1.noarch                                                                                  8/14 
  Verifying  : libnetfilter_conntrack-1.0.6-1.el7_3.x86_64                                                                                  9/14 
  Verifying  : python-slip-0.4.0-4.el7.noarch                                                                                              10/14 
  Verifying  : python-slip-dbus-0.4.0-4.el7.noarch                                                                                         11/14 
  Verifying  : python-decorator-3.4.0-3.el7.noarch                                                                                         12/14 
  Verifying  : ipset-libs-7.1-1.el7.x86_64                                                                                                 13/14 
  Verifying  : ebtables-2.0.10-16.el7.x86_64                                                                                               14/14 
                                                                                                                                                 
Installed:                                                                                                                                       
  firewalld.noarch 0:0.6.3-8.el7_8.1                                                                                                             
                                                                                                                                                 
Dependency Installed:                                                                                                                            
  ebtables.x86_64 0:2.0.10-16.el7                   firewalld-filesystem.noarch 0:0.6.3-8.el7_8.1     ipset.x86_64 0:7.1-1.el7                   
  ipset-libs.x86_64 0:7.1-1.el7                     iptables.x86_64 0:1.4.21-34.el7                   libmnl.x86_64 0:1.0.3-7.el7                
  libnetfilter_conntrack.x86_64 0:1.0.6-1.el7_3     libnfnetlink.x86_64 0:1.0.1-4.el7                 libselinux-python.x86_64 0:2.5-15.el7      
  python-decorator.noarch 0:3.4.0-3.el7             python-firewall.noarch 0:0.6.3-8.el7_8.1          python-slip.noarch 0:0.4.0-4.el7           
  python-slip-dbus.noarch 0:0.4.0-4.el7                                                                                                          
                                                                                                                                                 
Complete!


firewall 자동시작 설정을 합니다.

systemctl enable firewalld


firewall을 시작합니다.

systemctl start firewalld


728x90
반응형
728x90
반응형


던스 번호(D-U-N-S Number)란, D&B라는 회사에서 사업자 구분을 하기 위해 개별기업에 부여하는 개별기업 인식코드 입니다.


Apple 법인 개발자 등록을 위해 국제사업자번호(D-U-N-S Number)를 D&B로부터 부여받아 제출해야합니다.


차근차근 던스 번호를 발급받아 보겠습니다.


1. [DUNS 넘버 무료로 발급받기]

DUNS 넘버 찾기(등록)사이트에 접속합니다. 


https://developer.apple.com/enroll/duns-lookup/#!/search


로그인 - Apple


idmsa.apple.com


2. 양식 작성

영문사업자등록 증명서의 내용을 그대로 기입하시면 됩니다.


영문사업자등록 증명서는 세무서나 홈택스에서 발급받으실 수 있습니다.

Organization Information

영문 사업자 등록증에 있는 내용을 입력해야 합니다.


Country: South Korea

Legal Entity Name: 법인 회사명


Headquarters Address

Street Address: 회사 도로명

Town / City: 시/군/구

State / Province: 도

Postal Code: 우편번호

Phone Number: 연락받을 폰 번호


Your Contact Information

D-U-N-S 번호 발급 담당자 연락처 및 성함을 입력해주시면 됩니다.


Given Name: 이름

Family Name: 성

Work Phone Number: 연락처

Work Email: 회사 이메일(회사 도메인 권장)


3. 던스번호 요청

작성을 완료한 뒤 'Continue' 버튼을 클릭하였지만 던스 번호가 등록되어있지 않아 Dun & Bradstreet에서 법인에 정보를 제출하여 던스 번호를 요청하라고 합니다.


약관에 동의 후 'Submit' 버튼을 클릭하면 Dun & Bradstreet로부터 던스 번호 요청이 완료됩니다.


4. 던스 번호 요청 확인 이메일 수신

요청한 후 당일에 작성한 회사 이메일로 승인 메일이 수신됩니다.

Thank you for submitting your D-U-N-S Number request / update to D&B. 
It should be completed by 07/13/2020, or sooner. 
Your request id is: 000000-000000. 
A D&B representative may be contacting you directly. 
Your cooperation will help to expedite the resolution of this request. 
Please contact applecs@dnb.com if you have any questions.


5. 070 국제전화 통화 수신

메일을 수신하고 나면 070으로 시작하는 국제전화가 1~2일 내로 오는데 영어 또는 한국어로 연결됩니다.


이메일로 받은 Request id를 확인합니다.


(이 부분에서 인식이 안되어 전화가 종료될 수 있습니다. 해결 방법을 별도로 작성해 공유하겠습니다.)


6. 던스 번호 발급 완료 메일 수신

던스 번호 9자리를 포함한 메일을 수신합니다.


7일 후에 던스 번호를 사용할 수 있다는 것과 던스 번호로 메일로 도착하였습니다.

Your D-U-N-S Number request/update submitted on 2020-06-29 with ID Number 000000-000000 has been completed. 
You may start using your number in 7 days. 
D-U-N-S Number: 000000000 Resolution Description: Match Found via host investigation, 
host database updated The following information was submitted as part of your request: 
Business Name: 회사명 City: 시, 구 
Country: KOREA SOUTH (REP OF) Thank you for using D&B's Mini Investigation Service.


7. 던스 번호 확인

발급 받은 던스 번호를 확인하시려면 아래의 URL로 이동후 양식을 작성하시면 확인 가능합니다.


https://www.dandb.com/dunsnumberlookup/


Dun & Bradstreet D-U-N-S® Number Lookup


www.dandb.com


시간이 지나도 메일이 안오거나, 연락이 없다면 아래의 Apple 지원을 통해 해결할 수 있습니다.


https://developer.apple.com/kr/support/D-U-N-S/


D-U-N-S® 번호 - 지원 - Apple Developer

문의하기 어떻게 도와드릴 수 있는지 알려주시면 핸드폰이나 이메일을 통해 해결 방법을 찾아드립니다. 지원받기

developer.apple.com


728x90
반응형

+ Recent posts