728x90
반응형


xcode 프로그램을 사용하여 ios앱 개발을 진행하고 있습니다.


WKWebView를 사용하면서 부터 아래와 같은 로그가 미친듯이 쌓이는걸 확인했습니다.

2020-01-29 10:44:43.888094+0900 ... [Process] kill() returned unexpected error 1
2020-01-29 10:44:43.888500+0900 ... [Process] kill() returned unexpected error 1
2020-01-29 10:44:43.902618+0900 ... [Process] kill() returned unexpected error 1
2020-01-29 10:44:43.902855+0900 ... [Process] kill() returned unexpected error 1
2020-01-29 10:44:43.922252+0900 ... [Process] kill() returned unexpected error 1
2020-01-29 10:44:43.922653+0900 ... [Process] kill() returned unexpected error 1
2020-01-29 10:44:43.937681+0900 ... [Process] kill() returned unexpected error 1
2020-01-29 10:44:43.938035+0900 ... [Process] kill() returned unexpected error 1
2020-01-29 10:44:43.952512+0900 ... [Process] kill() returned unexpected error 1
2020-01-29 10:44:43.952803+0900 ... [Process] kill() returned unexpected error 1
2020-01-29 10:44:43.971390+0900 ... [Process] kill() returned unexpected error 1
2020-01-29 10:44:43.971738+0900 ... [Process] kill() returned unexpected error 1
2020-01-29 10:44:43.987230+0900 ... [Process] kill() returned unexpected error 1
2020-01-29 10:44:43.987671+0900 ... [Process] kill() returned unexpected error 1
2020-01-29 10:44:44.002040+0900 ... [Process] kill() returned unexpected error 1
2020-01-29 10:44:44.002279+0900 ... [Process] kill() returned unexpected error 1
2020-01-29 10:44:44.028231+0900 ... [Process] kill() returned unexpected error 1
2020-01-29 10:44:44.028484+0900 ... [Process] kill() returned unexpected error 1
2020-01-29 10:44:44.045407+0900 ... [Process] kill() returned unexpected error 1
2020-01-29 10:44:44.045611+0900 ... [Process] kill() returned unexpected error 1
2020-01-29 10:44:44.051319+0900 ... [Process] kill() returned unexpected error 1
2020-01-29 10:44:44.051555+0900 ... [Process] kill() returned unexpected error 1
2020-01-29 10:44:44.067757+0900 ... [Process] kill() returned unexpected error 1
2020-01-29 10:44:44.067934+0900 ... [Process] kill() returned unexpected error 1
2020-01-29 10:44:44.085097+0900 ... [Process] kill() returned unexpected error 1
2020-01-29 10:44:44.085338+0900 ... [Process] kill() returned unexpected error 1
2020-01-29 10:44:44.103037+0900 ... [Process] kill() returned unexpected error 1
2020-01-29 10:44:44.103237+0900 ... [Process] kill() returned unexpected error 1


해당 오류는 WebKit or OS 버그라고 하는데 iOS 13.2 버전에는 아직 해결되지 않았다고 합니다.


해결되지는 않았지만 엄청나게 생기는 Log 를 보기 싫으니 안보이게 처리해보겠습니다.


https://bugs.webkit.org/show_bug.cgi?id=202173


202173 – [iOS] Regression(r249703) frequent 'kill() returned unexpected error' log messages

Patch no flags Details | Formatted Diff | Diff

bugs.webkit.org

https://www.mail-archive.com/webkit-changes@lists.webkit.org/msg146193.html


[webkit-changes] [250329] trunk/Source/WebKit

Title: [250329] trunk/Source/WebKit Revision 250329 Author cdu...@apple.com Date 2019-09-24 18:56:50 -0700 (Tue, 24 Sep 2019) Log Message [iOS] Regression(r249703) frequent 'kill() returned unexpected error' log messages https://bugs.webkit.org/show_bug.cg

www.mail-archive.com


1. Product > Scheme > Edit Scheme

Edit Scheme 목록을 선택합니다.


2. Environment Variables 에 OS_ACTIVITY_MODE 변수를 추가 합니다.

Xcode 8.0 릴리스에서도 작동하는 솔루션입니다.


시스템 로그를 출력 안하도록 하는 설정입니다.


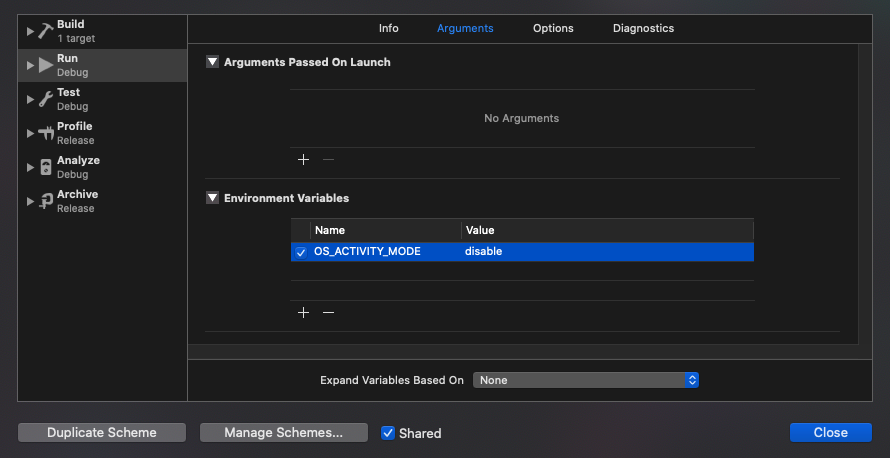
불필요한 로그를 보기 싫으시다면 위와같은 설정으로 처리 할 수 있습니다.


하지만 정작 봐야할 로그가 보이지 않을 경우가 있을수 있으니 원하시는 설정을 하시기 바랍니다.


728x90
반응형

'프로그래밍 > iOS' 카테고리의 다른 글

[XCode] ENABLE_BITCODE  (2) 2020.08.26
[Apple] 던스 번호(D-U-N-S Number) 받기  (0) 2020.07.03
[Swift5] Base64 Encode Url Safe  (0) 2020.01.14
[XCode] Cocoapod Build Error  (0) 2019.12.20
[XCode 11] iOS 13 다크모드 해제  (0) 2019.12.09
728x90
반응형


앱에서 서버로 ImageData를 Base64 Encode 해서 보내는데 "+" 부분이 " " 으로 변환되는 이슈가 있습니다.


해당 HTTP 통신할 떄 발생합니다.


이런 문제를 해결하기 위한 간단한 2가지 방법을 알아보겠습니다.


1. 서버와 약속된 문자열로 변환

클라이언트에서 특정 문자를 Url Safe 한 문자로 변환을 하여 서버에게 전송하면 서버에서 다시 원상태로 문자를 변환하는 작업입니다.


아래는 Swift 코드 이지만 서버도 비슷하게 처리 하면 됩니다.


toggleBase64URLSafe(on: true) 했을때 서버로 요청하는 url로 변환하고 false 는 url을 원상태로 변환합니다.

    func toggleBase64URLSafe(on: Bool) -> String {
        if on {
            // Make base64 string safe for passing into URL query params
            let base64url = self.replacingOccurrences(of: "/", with: "_")
                .replacingOccurrences(of: "+", with: "-")
                .replacingOccurrences(of: "=", with: "")
            return base64url
        } else {
            // Return to base64 encoding
            var base64 = self.replacingOccurrences(of: "_", with: "/")
                .replacingOccurrences(of: "-", with: "+")
            // Add any necessary padding with `=`
            if base64.count % 4 != 0 {
                base64.append(String(repeating: "=", count: 4 - base64.count % 4))
            }
            return base64
        }
    }


2. 특정 문자를 URL Encoding 하기.

서버를 자회사에서 관리한다면 약속된 문자열로 변환해도 상관없지만 타회사에 요청하는 경우엔 약속을 할 수 없습니다.


간단하게 아래와같이 특정부분을 URL Encoding 해서 보내면 문제는 사라집니다.


아래 코드로 HTTP 통신을 한다면 "+" 문자가 " "로 변환되어 집니다.

import Foundation

extension UIImage {
    var base64String: String {
        let imageData: NSData = self.jpegData(compressionQuality: 0.1)! as NSData
        let base64url = imageData.base64EncodedString(options: [.endLineWithCarriageReturn, .endLineWithLineFeed])
        return base64url
    }
}


하지만 아래 코드처럼 특정 문자를 URL Encoding 해서 보내면 서버에서도 문제없이 처리가 됩니다.


toReplace함수는 replacingOccurrences(of: of, with: with) 와 동일합니다.

import Foundation

extension UIImage {
    var base64String: String {
        let imageData: NSData = self.jpegData(compressionQuality: 0.1)! as NSData
        let base64url = imageData.base64EncodedString(options: [.endLineWithCarriageReturn, .endLineWithLineFeed])
        return base64url.toReplace("+", "%2B")
    }
}


728x90
반응형
728x90
반응형

형상관리를 하지만 IOS를 개발할때 파일의 충돌이 잘 발생합니다.


git ignore 설정을 하지 않는다면 다른 팀원과 소스 관리가 거의 불가능할 것입니다.


그럼에도 불구하고 Cocoapod 관련해서 오류가 발생한다면 재설치를 진행해야 정상 Build 가 됩니다.


터미널로 프로젝트 경로에 진입합니다.


Podfile. xcworkspace, Pods 폴더를 삭제하고 pod을 재설치 합니다.

sudo rm Podfile.lock 
sudo rm -r [프로젝트명].xcworkspace 
sudo rm -r Pods 
pod install


Proejct Clean 이나 Build 를 해서 되지 않는다면 위와 같은 방법으로 진행하시는걸 추천드립니다.


728x90
반응형
728x90
반응형


iOS 13 버전이 되면서 다크모드가 새롭게 추가되었습니다.


하지만 개발자에게는 앱 유지보수를 해야하는데 정보를 몰라서 곤경에 처하곤 합니다.


간단하게 다크모드 옵션을 해제하는 방법을 알아보겠습니다.


Info.plist

Xcode에서 info.plist 에서 아래와 같이 값을 추가 합니다.


Source Code는 아래와 같습니다.

<key>UIUserInterfaceStyle</key>
<string>Light</string>


AppDelegate

overrideUserInterfaceStyle앱의 window변수 에 대해 설정할 수 있습니다 .


프로젝트 생성 방법에 따라 AppDelegate파일 또는 SceneDelegate에 있을 수 있습니다.

if #available(iOS 13.0, *) {
    window?.overrideUserInterfaceStyle = .light
}


UIViewController

UIViewController를 개별적으로 선택 해제하려면 아래와 같이 viewDidLoad 메서드안에 작성할 수 있습니다.

override func viewDidLoad() {
    super.viewDidLoad()
    // overrideUserInterfaceStyle is available with iOS 13
    if #available(iOS 13.0, *) {
        // Always adopt a light interface style.
        overrideUserInterfaceStyle = .light
    }
}
728x90
반응형

'프로그래밍 > iOS' 카테고리의 다른 글

[Swift5] Base64 Encode Url Safe  (0) 2020.01.14
[XCode] Cocoapod Build Error  (0) 2019.12.20
Swift 4 UIAlertController  (0) 2019.03.05
Swift 4 TableView Section  (0) 2019.03.04
Swift 4 UIRefreshControl  (0) 2019.03.04
728x90
반응형


사용자에게 경고를 보여주거나 다시 한번 되물을때 Alert 기능을 사용합니다.


iOS에서도 간단하게 Alert 창을 구현할 수 있도록 지원을 하고 있는데요.


UIAlertController를 사용하여 만들어 보겠습니다.


프로젝트를 하나 만들어서 Storyboard 의 UIViewController에 버튼 2개를 만들었습니다.


Alert 과 ActionSheet 라는 버튼을 만들어 주었습니다.


Alert 버튼과 ActionSheet 버튼을 alertAction이라는 함수로 연결해주었습니다.


    @IBAction func alertAction(_ sender: UIButton) {
        if sender.titleLabel?.text == "Alert" {
            showAlert(style: .alert)
        } else {
            showAlert(style: .actionSheet)
        }
    }
cs


UIAlertController는 preferredStyle에 따라 Alert이 다르게 표현됩니다.

버튼 title이 Alert이면 style을 alert으로 정하고 아니면 actionSheet로 정해주었습니다.


style만 다르고 나머지 부분은 동일하기 때문에 showAlert이라는 함수를 만들어 주었습니다.


    func showAlert(style: UIAlertController.Style) {
        let alert = UIAlertController(title: "알림", message: "내용", preferredStyle: style)
        let success = UIAlertAction(title: "확인", style: .default) { (action) in
            print("확인")
        }
        
        let cancel = UIAlertAction(title: "취소", style: .cancel, handler: nil)
        let destructive = UIAlertAction(title: "삭제", style: .destructive)
        
        alert.addAction(success)
        alert.addAction(cancel)
        alert.addAction(destructive)
        
        self.present(alert, animated: true, completion: nil)
    }
cs


UIAlertController를 생성해주고 각 액션을 추가해주었고


각 기능을 하는 UIAlertAction 을 만들어 style을 다르게 설정하였습니다.


default : 일반적인 액션 버튼 


cancel : actionSheet로 표현 되거나 alertAction이 많아지면 맨 아래에 위치하게 됩니다.


estructive : 글자를 Red 색으로 표현해준다.


Alert 버튼 클릭 - 액션이 3개 이상


Alert 버튼 클릭 - 액션이 2개 이하


ActionSheet 버튼 클릭


각 UIAlertAction의 handler 에서 기능을 처리 하면 됩니다.


이렇게 간단하게 UIAlertController에 대해서 알아보았습니다.


728x90
반응형

'프로그래밍 > iOS' 카테고리의 다른 글

[XCode] Cocoapod Build Error  (0) 2019.12.20
[XCode 11] iOS 13 다크모드 해제  (0) 2019.12.09
Swift 4 TableView Section  (0) 2019.03.04
Swift 4 UIRefreshControl  (0) 2019.03.04
Swift 4 TableViewCell SwipeAction  (0) 2019.02.21
728x90
반응형


iPhone의 연락처 앱처럼 구분을 하여 목록을 보여주고 싶을 때가 있습니다.


블로그나 유튜브를 찾아봐도 TableView의 Section 구분만 나오는게 아닌


특정 기능까지 포함해서 나오기에 복잡해서 어려움도 많았습니다.


딱! 간단하게 TableView Section 처리하는 방법을 알아보겠습니다.


Storyboard에서 UIViewController에 TableView와 TableViewCell 을 추가해줍니다.


TableViewCell의 Attributes Inspactor 로 들어가


Identifier 를 'CellList' 라고 정해주었습니다.


이제 Swift 코드로 들어가보겠습니다.


import UIKit
 
class ViewController: UIViewController {
 
    @IBOutlet weak var tableView: UITableView!
    
    // 임의 데이터 넣기
    var items: [String= ["Apple""Facebook""Google""Kakao""Naver""NcSoft""Github"]
    
    override func viewDidLoad() {
        super.viewDidLoad()
        
        tableView.delegate = self
        tableView.dataSource = self
    }
}
cs


Storyboard의 TableView를 @IBOutlet 변수로 연결해주었고


tableVIew의 delegate, dataSource 를 'self'로 지정해 주었습니다.


extension ViewController: UITableViewDelegate, UITableViewDataSource {
    
    // Section count
    public func numberOfSections(in tableView: UITableView) -> Int {
        return Array(Set(self.items.map{ $0.first! })).count
    }
    
    // Section의 title
    func tableView(_ tableView: UITableView, titleForHeaderInSection section: Int-> String? {
        return String(Array(Set(self.items.map{ $0.first! })).sorted()[section])
    }
    
    // row 의 data 대입
    public func tableView(_ tableView: UITableView, cellForRowAt indexPath: IndexPath) -> UITableViewCell {
        let charactor = Array(Set(self.items.map{ $0.first! })).sorted()[indexPath.section]
        let cell = tableView.dequeueReusableCell(withIdentifier: "CellList"for: indexPath)
        cell.textLabel?.text = self.items.filter{ $0.first == charactor }[indexPath.row]
        return cell
    }
    
    // Section의 Row count
    public func tableView(_ tableView: UITableView, numberOfRowsInSection section: Int-> Int {
        let charactor = Array(Set(self.items.map{ $0.first! })).sorted()[section]
        return self.items.filter{ $0.first! == charactor }.count
    }
}
cs


ViewController 를 확장하여 TableView 프로토콜을 준수해 함수를 정의하였습니다.


각각 설명을 하겠습니다.


1. Section의 count를 return 합니다.


public func numberOfSections(in tableView: UITableView) -> Int
cs

return Array(Set(self.items.map{ $0.first! })).count
cs

items 라는 array를 map{ $0.first! } 하면 $0로 각각 한개씩 담겨지게 되고


first 변수에는 첫글자만 배열로 반환합니다.


반환된 배열을 Set 으로 담으면 중복이 제거됩니다.


Set을 다시 Array로 변환한 뒤 count를 return 합니다.


이렇게 해서 중복이 제거된 앞글자의 합을 Section count로 return 하였습니다.


2. Section의 title을 생성합니다.


func tableView(_ tableView: UITableView, titleForHeaderInSection section: Int-> String?
cs


return String(Array(Set(self.items.map{ $0.first! })).sorted()[section])
cs


Section count와 동일하게 한글자를 가져오고 각 section에 맞게 title이 셋팅됩니다.


3. 각 Section의 row count를 return 합니다.


public func tableView(_ tableView: UITableView, numberOfRowsInSection section: Int-> Int
cs


let charactor = Array(Set(self.items.map{ $0.first! })).sorted()[section]
return self.items.filter{ $0.first! == charactor }.count
cs


현재 Section에 해당되는 첫번째 문자열을 추출합니다.


filter{ $0.first == charactor} 배열에 들어있는 값과 추출한 문자열을 비교하여 맞는 값의 count를 return합니다.


4. 각 row에 data를 대입합니다.


public func tableView(_ tableView: UITableView, cellForRowAt indexPath: IndexPath) -> UITableViewCell
cs


let charactor = Array(Set(self.items.map{ $0.first! })).sorted()[indexPath.section]
let cell = tableView.dequeueReusableCell(withIdentifier: "CellList"for: indexPath)
cell.textLabel?.text = self.items.filter{ $0.first == charactor }[indexPath.row]
return cell
cs


현재 Section에 해당되는 첫번째 문자열을 추출합니다.


TableViewCell을 연결해줍니다.


filter{ $0.first == charactor } 배열에 들어있는 값과 추출한 문자열을 비교하여 맞는 값을 꺼낸 뒤


그안에서 indexPath.row 에 해당되는 값을 꺼내 textLabel에 넣어줍니다.


이렇게 Section 을 간단하게 분리해 보았습니다.


응용을 한다면 날짜별로 Section을 분리하는것도 쉽게 구현이 가능합니다.


728x90
반응형

'프로그래밍 > iOS' 카테고리의 다른 글

[XCode 11] iOS 13 다크모드 해제  (0) 2019.12.09
Swift 4 UIAlertController  (0) 2019.03.05
Swift 4 UIRefreshControl  (0) 2019.03.04
Swift 4 TableViewCell SwipeAction  (0) 2019.02.21
Swift 4 TextView PlaceHolder  (0) 2019.02.21
728x90
반응형

리스트 형식의 TableView 를 사용할 때에 새로고침 버튼을 두는것보다


아래로 당기면서 새로고침을 진행하는게 좋습니다.


네이버나 페이스북 유튜브의 경우에도 제일 상단 목록을 아래로 당기면 새로운 목록이 나오게 됩니다.


iOS에서도 이러한 기능을 지원을 하고 있어서 정리합니다.


UIRefreshControl 의 내부를 보겠습니다.


@available(iOS 6.0*)
open class UIRefreshControl : UIControl {
 
    
    /* The designated initializer
     * This initializes a UIRefreshControl with a default height and width.
     * Once assigned to a UITableViewController, the frame of the control is managed automatically.
     * When a user has pulled-to-refresh, the UIRefreshControl fires its UIControlEventValueChanged event.
     *
    */
    public init()
 
    
    open var isRefreshing: Bool { get }
 
    
    open var tintColor: UIColor!
 
    open var attributedTitle: NSAttributedString?
 
    
    // May be used to indicate to the refreshControl that an external event has initiated the refresh action
    @available(iOS 6.0*)
    open func beginRefreshing()
 
    // Must be explicitly called when the refreshing has completed
    @available(iOS 6.0*)
    open func endRefreshing()
}
cs


iOS 6.0 버전 이상부터 지원이 가능하고 UIControl 을 상속 받고 있습니다.


isRefreshing 은 현재 리프레쉬가 진행중인지를 나타냅니다.


tintColor 로 색상도 바꿀수 있구요.


attributedTitle 은 새로고침 indicator 아래에 텍스트를 설정합니다.


beginRefreshin 함수는 새로고침 시작을 알립니다.


endRefreshing 함수는 새로고침이 끝남을 알립니다.


이젠 실습으로 구현해 보겠습니다.


Storyboard 의 UIVIewController 에 TableView와 TableViewCell을 만들어 줍니다.


TableViewCell의 Attributes inspactor에 들어가서 indentifier 를 'Cell'로 정의해주었습니다.


Storyboard는 이정도만 만들고 Swift 코드로 넘어가겠습니다.


import UIKit
 
class ViewController: UIViewController {
    
    var array = ["Samsung""Apple""Lg""Google""Facebook"]
    @IBOutlet weak var tableView: UITableView!
    
    override func viewDidLoad() {
        super.viewDidLoad()
        tableView.delegate = self
        tableView.dataSource = self
        initRefresh()
    }
    
    // UIRefreshControl 초기 설정
    func initRefresh() {
        let refresh = UIRefreshControl()
        refresh.addTarget(self, action: #selector(updateUI(refresh:)), for: .valueChanged)
        refresh.attributedTitle = NSAttributedString(string: "새로고침")
 
        if #available(iOS 10.0*) {            
            tableView.refreshControl = refresh
        } else {
            tableView.addSubview(refresh)
        }
    }
    
    // 새로고침 함수
    @objc func updateUI(refresh: UIRefreshControl) {
        refresh.endRefreshing() // 리프레쉬 종료
        tableView.reloadData() // 테이블 뷰 로드
    }
}
 
cs


샘플로 만들었으며 array라는 배열에 임이의 값을 넣어주었습니다.


TableView를 IBOutlet 변수로 선언을 해주고 Storyboard의 TableView와 연결을 해주고


delegate와 dataSource를 self로 대입해 나 자신이 delegate와 dataSource 프로토콜을 준수하고 있다고 정의해줍니다.


UIRefrechControl 인스턴스화 하여 target을 설정해주면 스와이프 액션이 주어졌을때 연결한 uidateUI함수를 호출해 줍니다.


iOS 10 이전 버전은 TableView에 view를 등록해 주고, 이후는 TableView에 refreshControl 프로퍼티가 존재함으로 대입해 주면 됩니다. 


updateUI함수가 호출되면 리프레쉬를 종료하는 endRefreshing함수를 호출함으로써 새로고침 UI는 마무리가 되고


TableVIew를 재조회 합니다.


extension ViewController: UITableViewDelegate, UITableViewDataSource {
    
    func tableView(_ tableView: UITableView, cellForRowAt indexPath: IndexPath) -> UITableViewCell {
        let cell = tableView.dequeueReusableCell(withIdentifier: "Cell")!
        cell.textLabel?.text = array[indexPath.row]
        return cell
    }
    
    func tableView(_ tableView: UITableView, numberOfRowsInSection section: Int-> Int {
        return array.count
    }
}
cs


TableView 관련코드 입니다.


기존의 글에 많이 동일한 코드를 구현했으니 설명은 생략합니다.


TableView를 아래로 당겨줍니다.


설정했던 '새로고침'과 indicator가 나오면서 테이블을 재조회 합니다.


간단하게 TableView를 Refresh하는 방법을 알아보았습니다.


728x90
반응형

'프로그래밍 > iOS' 카테고리의 다른 글

Swift 4 UIAlertController  (0) 2019.03.05
Swift 4 TableView Section  (0) 2019.03.04
Swift 4 TableViewCell SwipeAction  (0) 2019.02.21
Swift 4 TextView PlaceHolder  (0) 2019.02.21
Swift 4 WKWebView 로딩(Indicator)  (0) 2019.02.20
728x90
반응형


위와 같이 테이블뷰에 좌측에서 또는 우측에서 스와이프를 하면 나오는 메뉴를 보았을 겁니다.


모바일 기기에 최소한의 정보를 보여주다보니 기능을 숨겨서 사용할 때가 있습니다.


이럴때 사용하기 편한 스와이프 액션을 알아보겠습니다.


override func viewDidload() {
    tableView.delegate = self
}
cs


tableView의 델리게이트를 준수하여 콜백 메소드를 구현했다는 표시로 self를 대입해줍니다.


// Mark: - TableView
extension MainViewController: UITableViewDelegate, UITableViewDataSource {
    ...

    // 셀 우측 스와이프
    func tableView(_ tableView: UITableView, trailingSwipeActionsConfigurationForRowAt indexPath: IndexPath) -> UISwipeActionsConfiguration? {
        
        let important = importantAction(at: indexPath)
        let delete = deleteAction(at: indexPath)
        return UISwipeActionsConfiguration(actions: [delete, important])
    }
    
    // 셀 좌측 스와이프
    func tableView(_ tableView: UITableView, leadingSwipeActionsConfigurationForRowAt indexPath: IndexPath) -> UISwipeActionsConfiguration? {
        let complete = completeAction(at: indexPath)
        return UISwipeActionsConfiguration(actions: [complete])
    }
}
cs


델리게이트를 준수하여 trailing, leading SwipreAction 별칭으로 되어있는 함수를 구현하였습니다.


셀 우측 스와이프를 할때 알람과 삭제 변수를 생성하고 UISwipeActionsConfiguration 함수 호출할때 인자로 넣어줍니다.


배열로 받기 때문에 여러개를 넣어도 되고 한개만 넣어도 됩니다.


셀 좌측 스와이프도 동일합니다.


    // 스와이프 알림
    func importantAction(at indexPath: IndexPath) -> UIContextualAction {
        let todo = todoList[indexPath.row]
        let action = UIContextualAction(style: .normal, title: "알림") { (action, view, success) in
        
            todo.setValue(!((todo.value(forKey: "isTodo"asBool)!), forKey: "isTodo")
            success(true)
        }
        action.image = UIImage(named: "icons8-clock-50")
        action.backgroundColor = UIColor.purple
        return action
    }
    
    // 스와이프 삭제
    func deleteAction(at indexPath: IndexPath) -> UIContextualAction {
        let action = UIContextualAction(style: .destructive, title: "삭제") { (action, view, success) in
            self.todoList.remove(at: indexPath.row)
            self.tableView.deleteRows(at: [indexPath], with: .automatic)
            success(true)
        }
        action.image = UIImage(named: "icons8-trash-can-50")
        action.backgroundColor = .red
        return action
    }
    
    // 스와이프 할일
    func completeAction(at indexPath: IndexPath) -> UIContextualAction {
        let action = UIContextualAction(style: .destructive, title: "할일") { (action, view, success) in
            success(true)
        }
        action.image = UIImage(named: "icons8-checkmark-50")
        action.backgroundColor = .blue
        return action
    }
cs


코드가 길어져 별도의 함수로 정의 하였습니다.


UIContextualAction 인스턴스를 만들어 주었고


이미지를 사용하려고 무료 icon 이미지를 넣어주었습니다.


처리 하고 싶은 로직을 클로저에서 처리하면 됩니다.


728x90
반응형

'프로그래밍 > iOS' 카테고리의 다른 글

Swift 4 TableView Section  (0) 2019.03.04
Swift 4 UIRefreshControl  (0) 2019.03.04
Swift 4 TextView PlaceHolder  (0) 2019.02.21
Swift 4 WKWebView 로딩(Indicator)  (0) 2019.02.20
Swift 4 WKWebView  (0) 2019.02.20
728x90
반응형

TextField 는 아이디나 비밀번호 입력을 받을때 사용하고


TextView는 HTML의 TextArea처럼 긴 글을 입력 받을 때 사용합니다.


TextField와 SearchBar는 입력을 한줄로 받기 때문에 PlaceHolder를 설정하여 입력설명을 적을수 있지만.


TextView는 별도의 기능을 지원하지 않습니다.


그래서 UITextViewDelegate를 준수해서 커스텀을 해야 PlaceHolder 처럼 구현을 할 수 있습니다.


Storyboard에서 TextView를 마우스 우클릭해서 컨트롤러에 연결하고 Delegate를 선택해도 되고.


override func viewDidLoad() {
    textView.delegate = self
}


위 처럼 소스 코드로 나 자신이 UITextViewDelegate를 준수하고 있다고 설정해줘도 됩니다.

extension MainViewController: UITextViewDelegate {
    
    // 편집이 시작될때
    func textViewDidBeginEditing(_ textView: UITextView) {
        textViewSetupView()
    }
    
    // 편집이 종료될때
    func textViewDidEndEditing(_ textView: UITextView) {
        if textView.text == "" {
            textViewSetupView()
        }
    }
    
    // 텍스트가 입력될때
    func textView(_ textView: UITextView, shouldChangeTextIn range: NSRange, replacementText text: String) -> Bool {
        // 개행시 최초 응답자 제거
        if text == "\n" {
            textView.resignFirstResponder()
        }
        return true
    }
}


편집이 시작될 때와 종료 되었을대 textViewSetupView 함수를 호출하도록 하였습니다.


현재 텍스트가 '내용입력' 이면 내용을 지우고 입력받을 수 있도록 글씨 색도 검정으로 바꿔주었고,


내용이 비어있을때에는 PlaceHolder 처럼 글씨는 회색으로 변경하고 '내용입력'을 넣어주었습니다.

// UITextView PlaceHolder 설정
    func textViewSetupView() {
        if textView.text == "내용입력" {
            textView.text = ""
            textView.textColor = UIColor.black
            
        } else if textView.text == "" {
            textView.text = "내용입력"
            textView.textColor = UIColor.lightGray
        }
    }


텍스트가 바뀔때에는 개행인지 판단하여 응답자를 없애줘서 포커스를 지워줍니다.


그러면 키보드도 자동으로 내려갑니다.


위와 같이 간단하게 TextView도 PlaceHolder처럼 커스텀해서 사용할 수 있습니다.


728x90
반응형

'프로그래밍 > iOS' 카테고리의 다른 글

Swift 4 UIRefreshControl  (0) 2019.03.04
Swift 4 TableViewCell SwipeAction  (0) 2019.02.21
Swift 4 WKWebView 로딩(Indicator)  (0) 2019.02.20
Swift 4 WKWebView  (0) 2019.02.20
Swift 4 TableView 이미지 비동기 처리  (0) 2019.02.20
728x90
반응형

webView.load() 만 실행한다고 해서 WebView 구성이 끝일까요?


사용자는 이 화면이 아직 조회되고 있는지 알아야 합니다.


화면이 오류로 멈춰있는데 언제까지 기다릴수도 없는일 입니다.


iOS에서는 화면의 로딩 중이라는것을 보여주도록 UIActivityIndicatorView를 지원하고 있습니다.


Indicator를 구성하여 웹뷰를 완성해보겠습니다.


    @IBOutlet weak var indicator: UIActivityIndicatorView!
cs


Storyboard에서 Indicator뷰를 생성하고 IBOutlet 변수로 정의합니다.


그리고 WKWebView가 로딩을 시작할 때와, 로딩이 끝날때, 오류일때를 각 함수를 호출해주는 Delegate를 준수하면됩니다.


    webView.navigationDelegate = self
cs


extension MainViewController: WKNavigationDelegate {
 
    // 로드 시작
    func webView(_ webView: WKWebView, didStartProvisionalNavigation navigation: KNavigation!) {
    
    }
 
    // 로드 종료
    func webView(_ webView: WKWebView, didFinish navigation: WKNavigation!) {
 
    }
 
    // 로드 오류
    func webView(_ webView: WKWebView, didFail navigation: WKNavigation!, withError error: Error) {
        
    }
}
cs


extension이라는 확장 키워드를 통해 WKNavigationDelegate 를 구현하는 함수를 따로 나눠 작성했습니다.


webview의 navigationDelegate를 나 자신으로 정하면 특정 행동을 취했을때 구현한 함수를 호출해줍니다.


WKNavigationDelegate를 준수하면 웹뷰의 많은 콜백 함수들을 사용할 수 있지만 몇가지만 구현해 보았습니다.


Activity Indicator View -> Behavior 


Animating 을 체크하면 indicator가 움직이게 된됩니다.


Hides When Stopped 를 체크하면 indicator가 멈출때 화면에서 감춰줍니다.


indicator.startAnimating()    // indicator가 움직인다.

indicator.stopAnimating()    // indicator가 멈춘다.


필요에 맞게 indicator함수를 호출하면 됩니다.

728x90
반응형

'프로그래밍 > iOS' 카테고리의 다른 글

Swift 4 TableViewCell SwipeAction  (0) 2019.02.21
Swift 4 TextView PlaceHolder  (0) 2019.02.21
Swift 4 WKWebView  (0) 2019.02.20
Swift 4 TableView 이미지 비동기 처리  (0) 2019.02.20
Swift 4 TableView 이미지 메모이제이션 기법  (0) 2019.02.20

+ Recent posts